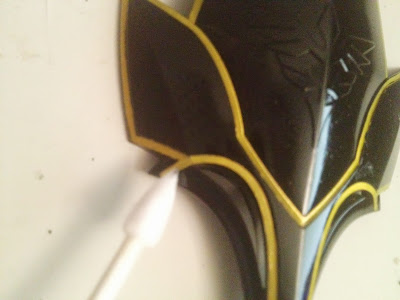
Painting "Sleeves" detail on Sinanju, Kshatriya and other Neo Zeon mobile suits
Painting the trim on Neo Zeon mobile suits like the Sinanju, Geara Zulu and Kshatriya is really easy, but a lot of people seem to have a tough time doing it. In this tutorial I'm going to show you a way to paint sleeve detail using an airbrush or spray can.
This technique is called a "reverse wash". Basically this process involves spraying two colors and removing one of the colors to reveal another. This process requires the use of paints that use different solvents; in other words you can't use two enamel, acrylic or lacquer colors. Although there are other combinations that probably work; I've had the most success using lacquer and enamel paints.
If these technique sounds familiar, it's because this is the same way I paint gundam eyes!
Before we begin you're going to need to gather a few items.
Hit the jump to see the rest of the tutorial!
Tools Required:
Either spray cans or bottles for airbrushing for the following.
Primer
Lacquer paint for the raised detail (usually gold or white)
Lacquer clear gloss (Acrylic has also worked for me)
Enamel paint for the sunk detail (usually black)
Enamel thinner to remove the enamel paint on the raised detail
Hobby cotton buds (I recommend using these because they will not leave cotton 'hairs' behind in the paint unlike Q-tips or other generic cotton swabs)
Process:
Once you have gathered all of your tools, sanded and cleaned the parts to be painted you're ready to start.
The first step is to apply a layer of primer to the parts to be painted.
Once the primer has dried and had time to cure; apply the base lacquer color. This is the color you want on the raised detail.
Again wait until the paint has had time to dry and cure; then apply a layer of clear gloss. The clear gloss is an optional step, however it makes removing the enamel paint much easier.
Some parts at more difficult to do the reverse wash technique on than others. The Sinanju's shield for example; has a complex pattern of lines, and some of the "raised" details are actually sunken to the plastic. However there's an easy solution!
Both the MG and HG versions of this kit come with gold stickers. These stickers are perfectly sized pre-cut pieces of masking tape! It's important that the clear coat has had enough time to cure completely before apply the decals; because the adhesive on the tape will mare the clear coat.
Now apply the a coat of enamel paint.
Typically I allow the enamel paint to dry for a few hours. However I start removing the paint while it's still slightly tacky. I've found that removing the paint before it full cures makes removing it easier. You do need to be careful not to touch the part while it's tacky, you will leave finger marks.
To remove the enamel paint dip the end of you cotton swab in the enamel thinner, and then rub it against the raised surfaces to reveal the paint beneath. You will use many cotton swabs during this step; so don't be afraid to swap them out as they get dirty. I highly recommend using hobby swabs for these steps. Q-tips or the generic alternative will leave scores of white cotton hairs in the paint. Another advantage of the hobby cotton buds is that they're tightly wound and compressed; this allows you to agitate and scrub the enamel better than a Q-tip.
If you make a mistake and remove too much paint don't panic. You can always repaint another layer of enamel and try again.
Slowly peel the stickers off of the shield before you start to remove the enamel paint.
The shield will probably require some additional work along the edges where enamel paint seeped under the decals.
You will still need to clean up the edges of the part, as well as the center emblem with enamel thinner and a cotton swab. But this technique is far faster and easier than just about any other technique for painting the shield!
If you have any questions about anything covered in this tutorial leave a comment below!


Hye, i know its year 2013, i hope you still active in this page. there's a question i wanted to ask you about reverse wash.
ReplyDelete1. What is the ratio to thin the enamel paint? i was told 3:2 (Paint:Thinner) but not sure if it is the correct one to use.
2. After complete reverse washing process, how do you seal the paint? can i use lacquer top coat on top of it?
Thank you in advance :)
The ratio is good, a top coat without thinner is best , i recommend the tamiya top coat (look for the no thinner one)
ReplyDelete